


What Is a Reversing Valve?
A reversing valve is a special part in heat pumps that lets them switch between heating and cooling. This valve changes the direction that refrigerant flows through the system. When the valve switches positions, your heat pump can either warm your home in winter or cool it in summer. Without a reversing valve, a heat pump would only work one way and couldn’t do both jobs. This small but mighty component is what makes heat pumps so useful all year round.
The reversing valve sits inside your heat pump’s outdoor unit. It has four ports (openings) that connect to different parts of the refrigerant line. When the valve moves, it redirects the refrigerant flow, changing how the system works. Think of it like a traffic officer directing cars – it tells the refrigerant which way to go.
Most people don’t think about their reversing valve until something goes wrong. But understanding how it works can help you spot problems early and keep your heat pump running smoothly. Let’s explore how this important part works and what to do if it has issues.
How a Reversing Valve Works
The reversing valve has a simple job but does it in a clever way. Inside the valve is a sliding mechanism that moves back and forth between two positions. This movement changes which paths the refrigerant can take through your heat pump system.
Basic Operation
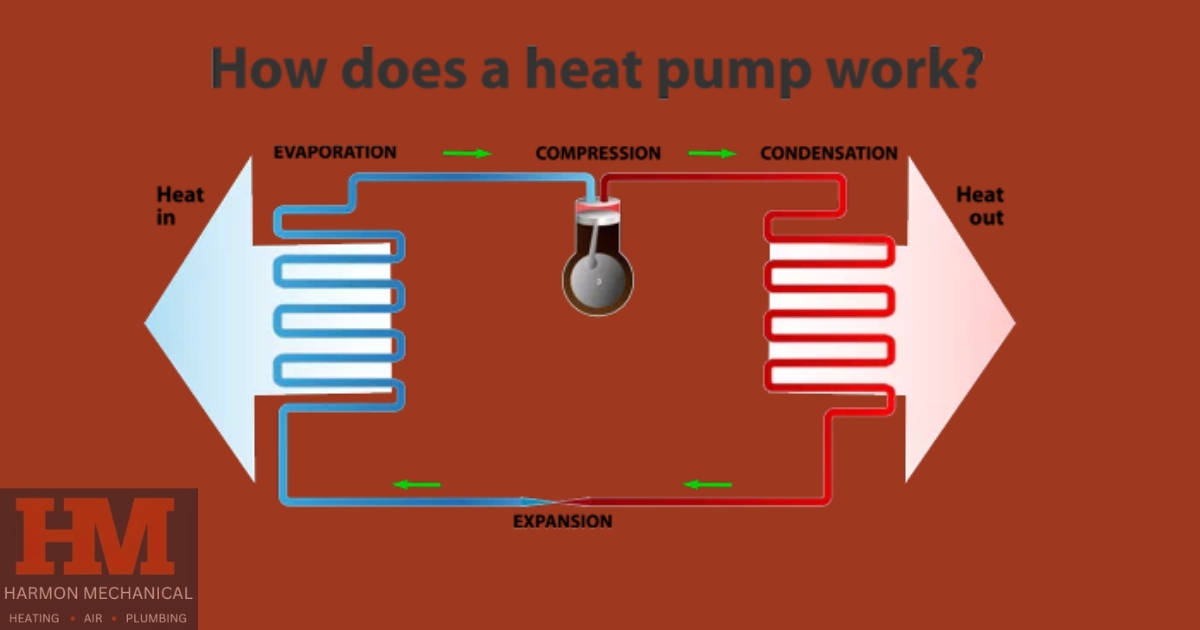
When your thermostat calls for cooling, an electrical signal activates a solenoid (a type of electromagnet) on the reversing valve. This pulls the sliding mechanism to one position. In this position, the hot refrigerant from the compressor flows to your outdoor coil first, where it releases heat outside. Then the cooled refrigerant moves to your indoor coil, where it absorbs heat from inside your home, making it cooler.
When heating is needed, the solenoid turns off (or on, depending on the system design). This moves the slider to its other position. Now the hot refrigerant goes to your indoor coil first, releasing heat into your home. Then it travels to the outdoor coil to absorb heat from the outside air.
The valve itself doesn’t use much energy. It only needs electricity when it’s changing positions, not to stay in place. This makes it an efficient part of your heat pump system.
The Four-Way Design
A reversing valve has four ports or connections:
– One connects to the compressor discharge (output)
– One connects to the compressor suction (input)
– One connects to the indoor coil
– One connects to the outdoor coil
This four-way design is why it’s sometimes called a “four-way valve.” The sliding mechanism inside creates two different path configurations for the refrigerant, depending on whether you need heating or cooling.
Signs of Reversing Valve Problems
Like any mechanical part, reversing valves can develop problems over time. Here are some common signs that your reversing valve might be having issues:
Stuck in One Mode
The most obvious sign is when your heat pump gets stuck in either heating or cooling mode. If you set your thermostat to cool but get warm air (or vice versa), your reversing valve might be stuck. This happens when the sliding mechanism inside can’t move properly or the solenoid fails to activate it.
Sometimes, the valve gets stuck in a middle position. When this happens, your system might blow lukewarm air that’s neither properly heated nor cooled. This is because the refrigerant is taking a mixed path through the system.
Strange Noises
Listen for unusual hissing or whistling sounds coming from your outdoor unit. These noises might happen when the valve is trying to switch positions. A healthy reversing valve should change modes quietly. Loud noises often mean refrigerant is leaking past the valve’s internal seals.
Some clicking sounds are normal when the valve activates, but loud banging or rattling usually indicates a problem. These sounds might mean the valve is physically damaged or that parts inside it have come loose.
Reduced Efficiency
If your energy bills suddenly increase without explanation, your reversing valve might be leaking internally. When this happens, some refrigerant bypasses the normal path, making your system work harder to heat or cool your home.
You might also notice your home takes longer to reach the temperature on your thermostat. This happens because a faulty reversing valve reduces the efficiency of the whole system, making it work harder for the same result.
Common Reversing Valve Problems and Solutions
When reversing valves fail, there are several possible causes. Here are the most common problems and what can be done about them:
Electrical Issues
Often, the problem isn’t with the valve itself but with its electrical components. The solenoid coil that moves the valve might burn out or disconnect. An HVAC technician can test the solenoid with a multimeter to see if it’s receiving power and responding correctly.
Sometimes, the issue is with the thermostat or control board not sending the right signals to the valve. In these cases, fixing the electrical connections or replacing the solenoid might solve the problem without replacing the entire valve.
Mechanical Failures
The sliding mechanism inside the valve can become stuck due to debris or damage. This is more common in older systems where wear and tear has affected the valve’s internal parts. Sometimes, a technician can try to free a stuck valve by rapidly changing the thermostat between heating and cooling modes, which might dislodge minor obstructions.
In more serious cases, the valve’s internal seals might be damaged, allowing refrigerant to leak between chambers. This creates a partial bypass that reduces efficiency. Unfortunately, there’s no way to repair internal valve damage – the entire valve must be replaced.
Refrigerant Pressure Problems
Incorrect refrigerant pressure can prevent the valve from switching properly. If the pressure is too high or too low, the valve might not have enough force to move. A technician will check refrigerant levels and pressure as part of diagnosing reversing valve issues.
Sometimes, adding the correct amount of refrigerant can solve what appears to be a valve problem. This is why it’s important to have a professional diagnosis rather than assuming the valve needs replacement.
Maintenance Tips for Reversing Valves
While you can’t directly maintain the reversing valve yourself, there are steps you can take to help it last longer and work better:
Regular System Maintenance
Schedule yearly maintenance checks for your heat pump system. During these visits, a technician will inspect all components, including the reversing valve. They can spot early signs of problems before they cause a complete failure.
Keep the area around your outdoor unit clean and free of debris. Good airflow helps maintain proper system pressure, which is important for the reversing valve to function correctly. Trim plants at least 2 feet away from the unit on all sides.
Proper Use of Your System
Avoid frequently switching between heating and cooling modes in short periods. While modern valves are designed to handle mode changes, excessive switching can cause unnecessary wear. Try to stick with one mode for at least a few hours before changing.
During extreme weather, don’t set unrealistic temperature expectations. If it’s very cold outside and you set your thermostat very high, your system will work extra hard. This puts stress on all components, including the reversing valve.
Professional Inspections
Have a professional check your system before the heating and cooling seasons begin. This twice-yearly inspection can catch problems early. The technician can verify that the reversing valve switches properly and that refrigerant pressures are correct.
If you notice any of the warning signs mentioned earlier, call for service right away. Early intervention can sometimes prevent a complete valve failure, saving you money on repairs.
When to Replace a Reversing Valve
Sometimes, repair isn’t possible and replacement becomes necessary. Here’s what you should know about replacing a reversing valve:
Replacement Indicators
Complete failure to switch between modes, despite electrical components working properly, usually means the valve needs replacement. Internal leakage that significantly affects performance is another clear indicator.
If your heat pump is more than 10-15 years old and having reversing valve issues, replacement often makes more sense than repair. Older systems may have other worn components as well, and a new valve might not solve all the problems.
The Replacement Process
Replacing a reversing valve is not a DIY job. It requires specialized tools and knowledge of refrigerant handling. A qualified technician will:
1. Recover the refrigerant from your system
2. Remove the old valve by cutting it out of the refrigerant lines
3. Install the new valve with proper brazing techniques
4. Pressure test the system for leaks
5. Evacuate air from the system using a vacuum pump
6. Recharge the system with the correct amount of refrigerant
7. Test the system in both heating and cooling modes
The process typically takes 2-4 hours and should only be done by certified HVAC professionals. Improper installation can lead to refrigerant leaks or system damage.
Cost Considerations
Replacing a reversing valve isn’t cheap. The parts alone can cost $200-$500, and labor adds another $300-$700 depending on your location and system complexity. The total cost typically ranges from $500-$1,200.
However, this cost should be weighed against the efficiency losses from a faulty valve. A leaking valve can increase your energy bills by 10-20%, which adds up quickly. Sometimes, replacement is the most economical choice in the long run.
Frequently Asked Questions About Reversing Valves
How long do reversing valves typically last?
With proper maintenance, a reversing valve can last 10-15 years, often for the entire lifespan of the heat pump. However, systems that switch between heating and cooling frequently may experience shorter valve life. Regular maintenance can help maximize the valve’s lifespan.
Can I manually switch a reversing valve?
No, you cannot manually switch a reversing valve as a homeowner. The valve is controlled electrically and is located within the sealed refrigerant system. Attempting to manually manipulate it would require breaking into the refrigerant lines, which is illegal without proper certification and would damage your system.
Why does my heat pump make noise when switching modes?
A slight clicking sound is normal when the reversing valve activates. This is the sound of the solenoid engaging and the internal slider moving. However, loud banging, hissing, or whistling noises are not normal and indicate a problem that should be checked by a professional.
Does a reversing valve use a lot of electricity?
No, the reversing valve itself uses very little electricity. The solenoid that activates it only draws power momentarily when changing positions. The valve doesn’t use any electricity to maintain its position in either heating or cooling mode. This makes it a very energy-efficient component.
Can a reversing valve be repaired instead of replaced?
In most cases, a faulty reversing valve must be replaced rather than repaired. The valve is a sealed component, and internal problems like damaged seals or a stuck slider cannot be fixed. However, sometimes what appears to be a valve problem is actually an electrical issue with the solenoid or wiring, which can be repaired without replacing the valve.
How can I tell if my reversing valve is bad or if it’s another problem?
The only way to know for sure is to have a professional diagnosis. A technician can test the electrical signals to the valve, check refrigerant pressures, and observe system operation to determine if the valve is at fault. Many symptoms of a bad reversing valve can also be caused by other problems like refrigerant leaks, compressor issues, or thermostat malfunctions.
Conclusion: The Importance of a Working Reversing Valve
The reversing valve might be just one component in your heat pump system, but it’s essential for the system’s dual functionality. Without it, your heat pump would be limited to either heating or cooling, not both. This small but crucial part is what makes heat pumps so versatile and efficient for year-round comfort.
When a reversing valve works properly, you probably won’t even notice it. It quietly does its job, switching between modes as needed. But when problems develop, they can quickly affect your comfort and your energy bills. Knowing the signs of trouble can help you address issues before they lead to complete system failure.
Regular maintenance is the best way to protect your reversing valve and your entire heat pump system. Professional inspections can catch small problems before they become big ones. And when replacement becomes necessary, working with qualified technicians ensures the job is done right.
If you’re experiencing issues with your heat pump not switching properly between heating and cooling, don’t wait until you’re left without comfort. Contact Harmon Mechanical today to schedule an inspection of your system. Our experienced technicians can diagnose reversing valve problems and recommend the best solution to keep your home comfortable all year round.